|
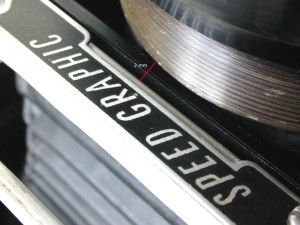
Image I
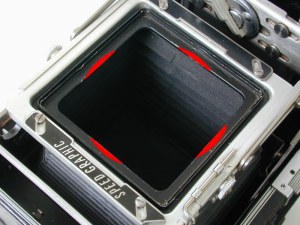
Image II
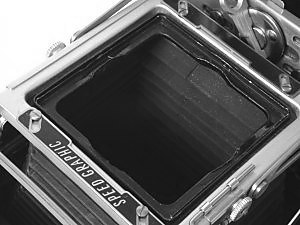
Image III
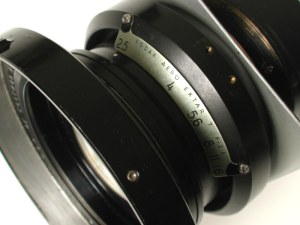
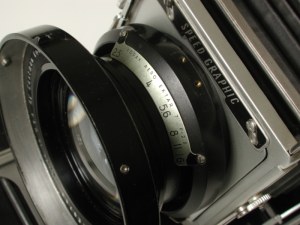
Image IV
Taped rear end
Alternate retainer ring
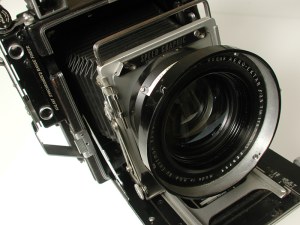
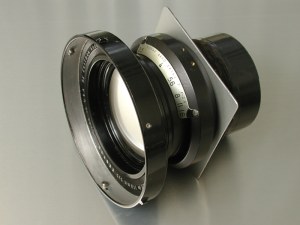
Image V
|
|
T H E P E R F E C T F I T
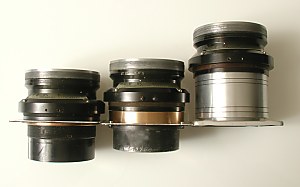
REF : MOD I by Graflex (1948)
REF : MOD II by Lommen(2005)
REF : MOD III by Jdesq (2006)
REF : MOD IV by Lommen (2008)
| TOOLS NEEDED |
If you opt for this Modding, you will only need a retainer ring, Lensboard with a 78mm hole and black insulation tape
RESUME:If you plan to buy the nice JOLO mount or earlier Mod I and Mod II, there is NO need for widening the light trap
|
| DISCLAIMER |
Modding the lighttrap using a Dremel will result in a lot of chipping...inside the bellows!
Take your precautions before you start the modificartion. Be sure the FP shutter is open and protected Afterwards you must clean the inside of the bellows with a vacuum cleaner.
Ideal would be if you remove the bellows beforehand.
llllllllllllllll
Read on....
|
WARNING:: This Modification is not for the fainthearted!!!
Before attempting this rigorous modification, check the retainer ring will run smoothly till the end. (Sometimes threads are damaged and the retainer ring will stick somewhere in between, using force can make it remain there a few days short of forever!)
You might well risk the situation where you loose a fine camera /lens and consign it to the trash heap if you tinker with it. Do what you must....but use great caution and be aware of the risk. Good luck.
Just for your peace of mind...It can be done! Read on.
Working with the two types (Mod I - Mod II) above and evaluating the movements and weight on the front panel, it crossed my mind there must be another possibility to mount the AE.
The idea popped up again after my sojourn with the Wisner 810/AE 7In, it just was a relief placing the board.
I had this idea from the beginning, but I did not dare to attack my first Pacemaker SG with a dremel...
As I have the other solutions (Mod. I and Mod. II - see Aero Memorandum) on two different cameras it was an easy decision to mod my third Pacemaker and refer to it as MOD 3 / Mod III!
Actually this is the ultimate solution if you don't mind some alterations on the light trap itself.
As the AE measures about 78mm (Including thread)and till now was allowed to penetrate only 4mm to stay within the depth of the original lensboard.
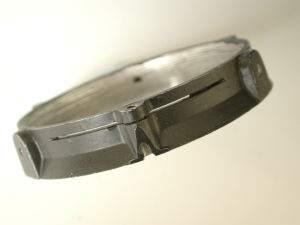
The opening square and light trap measures 74.7mm (Image I), thus we need to remove from each side 1.7mm to allow the lens to penetrate completely.
You don't have to to this everywhere but only on the red markers as you can see in image II.
Img III will show the result after modification, clicking gives a detail of one side of the light trap.
What are the benefits?
Advantage:
-
Much better weight placement, lesser stress on the front standard.(Lens penetration is 12mm deeper)
- No need for a spacer ring (# 1 The diaphragm is flush to the board. # 2 Cheaper..)
- Ideal placement of the lens to react on movements more directly. (Greater use of movements without vignetting).
- The widened light trap is now >78 mm and the rear element can be taped with black insulation tape.
- Easy to change lensboards (no more fumbling). Just mount the Aero Ektar the same as your other lenses. When using a spacer instead, please note: The light trap has ample room to accomodate the AERO Ektar, consequently paint will scrape off, showing silver colored highlights. Internal reflections, also known as Image forming light, can occur at all times and reduce overall contrast even more.
Disadvantage:
- Just one! We have to make surgical incisions with a Dremel on the original light trap, thus altering the original state of the camera.
A lot of chipping will occur during the dremel process.
Thorough cleaning of the bellows with a small vacuum cleaner necessary!
N O T E ::
Speaking for myself I think this is a minor nuisance, however collectors may feel different!.
For us Photographers the only thing that counts is that it does not harm any functionality with other lenses at all.
Actually working in the field you soon will notice a few more movements can come in handy, the SG can't cope with any situation. If you want a large DOF for example a front forward tilt is mandatory.
To get all the bokeh you need, you can use the backwards tilt...and yes luckily it is there on our SG!
I myself use the SG for the Aero Ektar exclusively, for all other instances I use a real view camera and lenses with leaf shutters.
In my view the Aero Ektar can compete only on f 2.5 with the modern plasmats.(No wonder there aren't any plasmats with larger apertures than f 5.6 ) Modern lenses can perform much better when uniform sharpness and contrast is required.
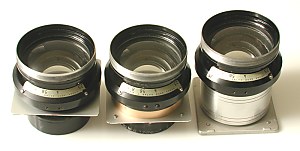
Mounting:
Parts needed:
#1 Preferred lensboard Graflex type, bored with a hole of 78 mm
#2 Retainer ring max 4 mm
#3 Aero Ektar 7 In
- Drop the lens through the hole of the lensboard as far as it will go.
- Screw on the small retainer ring 4 mm flush and tight to the board.
- Now the easiest part, place the lensboard as usual!
Img IV clearly shows the better placement of the lens after remounting the lens (No spacer). The thread goes in much deeper thus not needing a spacer.
Img V gives a detailed view of the lens flush to the board. I used electric insulation tape to blacken the rear end of the barrel, resulting in a nice, clean appearance ....
Retainer ring at a shoestring? You bet...
If the lens came in its original mount.
Just look for a Machinest to slice-off this part.
The start of the cut is already there, afterwards you can file the ring till it matches inside the lensboard.
MOD 3 completed successfully on Oct, 29th 2006 Driebergen-R
by

John D. de Vries.
|